제 Premium Suite Ver 3.4의 기능 중 하나인
키보드 상단 숫자키를 추가하는 방법을 알려드리겠습니다.
원래 진작에 썻어야 했는데;; 어쩌다 보니 늦어졌네요..
음.. 뭐 이거야 어렵지 않죠
그냥 갤럭시 노트2 키보드를 포팅하면 되는ㄷ..<<퍽

아니 여기 증거가 있ㄴ...<<펖퍼ㅓ퍼퍽
각설하고 본론으로 들어가겠습니다;;
갤럭시S2 기준으로 설명하겠습니다.
(모든 자료는 갤럭시 노트2에서 추출하였습니다.)
데스크탑으로 보시기 바랍니다!!
우선 SamsungIME.apk 파일을 디컴파일 해주세요.
그리고 이 파일들을 수정할겁니다.
/res/xml-sw320dp-hdpi/qwerty_en.xml
/res/xml-sw320dp-hdpi/qwerty_kr.xml
/res/xml-sw320dp-hdpi/qwerty_kr_to_en.xml
/res/xml-sw320dp-hdpi/properties.xml
먼저 qwerty_en.xml 파일을 열어줍니다.
<?xml version="1.0" encoding="utf-8"?>
<Keyboard android:screenOrientation="portrait" android:keyWidth="@dimen/qwerty_default_key_width" android:keyHeight="@dimen/qwerty_default_key_height" android:horizontalGap="@dimen/qwerty_default_key_horizontal_gap" android:verticalGap="@dimen/qwerty_default_key_vertical_gap"
xmlns:android="http://schemas.android.com/apk/res/android">
<Row android:keyHeight="0.0px" android:horizontalGap="0.0px" android:verticalGap="@dimen/qwerty_first_line_vertical_gap">
<Key android:keyWidth="100.0%p" android:codes="-257" android:keyLabel="StrEmpty" />
</Row>
<Row android:rowEdgeFlags="top">
<Key android:horizontalGap="@dimen/qwerty_first_col_horizontal_gap" android:codes="113" android:popupCharacters="@string/default_umlaut_q" android:keyEdgeFlags="left" android:keyLabel="q" />
<Key android:codes="119" android:popupCharacters="@string/default_umlaut_w" android:keyLabel="w" />
<Key android:codes="101" android:popupCharacters="@string/default_umlaut_e" android:keyLabel="e" />
<Key android:codes="114" android:popupCharacters="@string/default_umlaut_r" android:keyLabel="r" />
<Key android:codes="116" android:popupCharacters="@string/default_umlaut_t" android:keyLabel="t" />
<Key android:codes="121" android:popupCharacters="@string/default_umlaut_y" android:keyLabel="y" />
<Key android:codes="117" android:popupCharacters="@string/default_umlaut_u" android:keyLabel="u" />
<Key android:codes="105" android:popupCharacters="@string/default_umlaut_i" android:keyLabel="i" />
<Key android:codes="111" android:popupCharacters="@string/default_umlaut_o" android:keyLabel="o" />
<Key android:codes="112" android:popupCharacters="@string/default_umlaut_p" android:keyEdgeFlags="right" android:keyLabel="p" />
</Row>
그러면 이렇게 나올텐데요
<Row android:keyHeight="@dimen/qwerty_number_key_height" android:rowEdgeFlags="top">
<Key android:horizontalGap="@dimen/qwerty_first_col_horizontal_gap" android:codes="49" android:keyEdgeFlags="left" android:keyLabel="1" />
<Key android:codes="50" android:keyLabel="2" />
<Key android:codes="51" android:keyLabel="3" />
<Key android:codes="52" android:keyLabel="4" />
<Key android:codes="53" android:keyLabel="5" />
<Key android:codes="54" android:keyLabel="6" />
<Key android:codes="55" android:keyLabel="7" />
<Key android:codes="56" android:keyLabel="8" />
<Key android:codes="57" android:keyLabel="9" />
<Key android:codes="48" android:keyEdgeFlags="right" android:keyLabel="0" />
</Row>
<Row>
이 구문으로 바꿔치기 해줍니다.
그러면 이렇게 되겠죠?
<?xml version="1.0" encoding="utf-8"?>
<Keyboard android:screenOrientation="portrait" android:keyWidth="@dimen/qwerty_default_key_width" android:keyHeight="@dimen/qwerty_default_key_height" android:horizontalGap="@dimen/qwerty_default_key_horizontal_gap" android:verticalGap="@dimen/qwerty_default_key_vertical_gap"
xmlns:android="http://schemas.android.com/apk/res/android">
<Row android:keyHeight="0.0px" android:horizontalGap="0.0px" android:verticalGap="@dimen/qwerty_first_line_vertical_gap">
<Key android:keyWidth="100.0%p" android:codes="-257" android:keyLabel="StrEmpty" />
</Row>
<Row android:keyHeight="@dimen/qwerty_number_key_height" android:rowEdgeFlags="top">
<Key android:horizontalGap="@dimen/qwerty_first_col_horizontal_gap" android:codes="49" android:keyEdgeFlags="left" android:keyLabel="1" />
<Key android:codes="50" android:keyLabel="2" />
<Key android:codes="51" android:keyLabel="3" />
<Key android:codes="52" android:keyLabel="4" />
<Key android:codes="53" android:keyLabel="5" />
<Key android:codes="54" android:keyLabel="6" />
<Key android:codes="55" android:keyLabel="7" />
<Key android:codes="56" android:keyLabel="8" />
<Key android:codes="57" android:keyLabel="9" />
<Key android:codes="48" android:keyEdgeFlags="right" android:keyLabel="0" />
</Row>
<Row>
<Key android:horizontalGap="@dimen/qwerty_first_col_horizontal_gap" android:codes="113" android:popupCharacters="@string/default_umlaut_q" android:keyEdgeFlags="left" android:keyLabel="q" />
<Key android:codes="119" android:popupCharacters="@string/default_umlaut_w" android:keyLabel="w" />
<Key android:codes="101" android:popupCharacters="@string/default_umlaut_e" android:keyLabel="e" />
<Key android:codes="114" android:popupCharacters="@string/default_umlaut_r" android:keyLabel="r" />
<Key android:codes="116" android:popupCharacters="@string/default_umlaut_t" android:keyLabel="t" />
<Key android:codes="121" android:popupCharacters="@string/default_umlaut_y" android:keyLabel="y" />
<Key android:codes="117" android:popupCharacters="@string/default_umlaut_u" android:keyLabel="u" />
<Key android:codes="105" android:popupCharacters="@string/default_umlaut_i" android:keyLabel="i" />
<Key android:codes="111" android:popupCharacters="@string/default_umlaut_o" android:keyLabel="o" />
<Key android:codes="112" android:popupCharacters="@string/default_umlaut_p" android:keyEdgeFlags="right" android:keyLabel="p" />
</Row>
이상태로 저장합니다.
qwerty_kr.xml, qwerty_kr_to_en.xml 도 같은 방법으로 수정해 주면 됩니다.
다음으로 properties.xml 을 엽니다.
그리고 NUMBER_KEY를 찾으면 다음과 같은 줄이 나오는데요
<Property key="USE_ADDTO_NUMBER_KEY_FIRST_LINE" value="false" type="bool" />
여기서 false를 true로 바꿔줍니다.
<Property key="USE_ADDTO_NUMBER_KEY_FIRST_LINE" value="true" type="bool" />
마지막으로 저장하고 컴파일 한 후에 /preload/symlink/system/app 에 644 퍼미션 주신 후 투척하시고
재부팅 하시면 끝납니다.
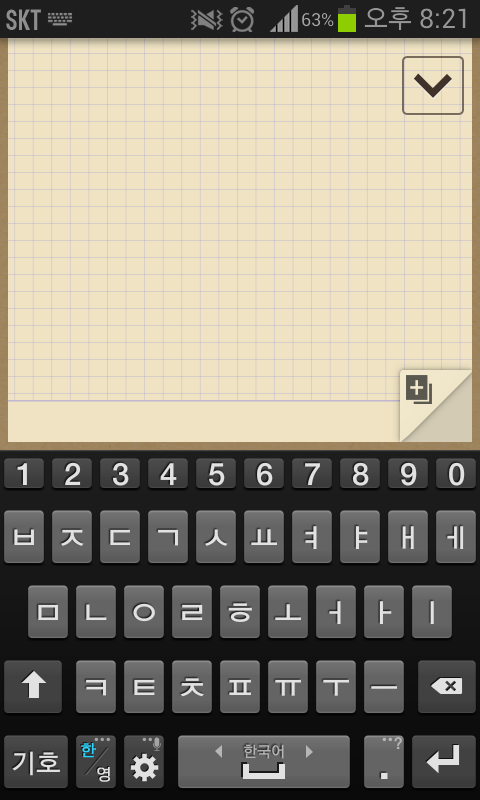
그런데 버튼이 너무 작다구요?
그러면 /res/values-sw320dp-hdpi/dimens.xml 을 여신 후에
<dimen name="qwerty_number_key_height">33.0px</dimen>
이 구문을 수정해 주시면 됩니다.
수정한 스샷입니다.

* 쿼티모드에서 한/영 - 특수문자 전환시 딜레이 줄이는 법!
작업 끝내고 컴파일 하기 전에
첨부한 qwerty_number_symbols.xml 파일을 /res/xml-sw320dp-hdpi 에 투척하시고 컴파일 하시면 됩니다.
그런데 이렇게 하면 입력할 수 있는 특수문자가 줄어듭니다.
그럼 유용하게 쓰세요~
p.s. 한영키 연타했을때 키보드 아래가 짤리는건 노트2 키보드도 동일하더라구요
물론 직접 노트2로 테스트 해보지는 않았습니다;;